« Back Ballistics app tips: Sight-In POI
We are kicking off a brand new series on our website:
Lapua Ballistics app tips! Get the most out of our free of charge ballistics calculator by following our tips which we will be sharing all through year 2020.
Tips in the series:
Utilizing Point Blank Range and V0 or Muzzle velocity calculation
NEW: The Sight-In POI feature
Coming up next: Coriolis effect, Benefits of 6 DOF calculation and Trajectory calculation for bullets and cartridges
TIP: The Sight-In POI feature - how to use several cartridges in the same firearm
Sight-In POI is a tool that can be utilized when you need to use several different types of cartridges in the same firearm without changing the basic sight-in setup of the scope. Knowledge of how different types of cartridges behave in your own rifle extends, for instance, the practice season well into the hunting season, and it means you can use the appropriate ammunition in any situation without having to sight-in the firearm again. When using the Sight-In POI feature, several different cartridge variations can be built around the sight-in settings of the rifle’s primary cartridge, depending on what cartridge needs you have.
How to use the Sight-In POI feature in Lapua Ballistics:
- Make sure you have set the reticle click units for your scope correctly in the app.
- Select the rifle profile you want to use as your primary profile and primary cartridge and sight-in the rifle to suit it.
- Copy the primary profile under another name (eg. Cartridge 2), select your preferred 2nd cartridge and set the correct muzzle velocity for it
- Test shoot the 2nd cartridge at your preferred distance without changing the scope settings.
- After test shooting, measure the distance (height and width) between the hits of the shot group and the point of aim, and calculate how many scope clicks this difference corresponds to.
- Alternatively, you can determine the corrections by re-sighting the rifle with the 2nd cartridge. When choosing this option we recommend zeroing the turrets for the primary profile. Next, carefully calculate the needed number of clicks for Cartridge 2. Once you have the number of clicks add them to the Sight-In POI Elevation and Windage windows of your Cartridge 2 profile.
- Enter a positive number if the 2nd cartridge hits above or to the right of the point of aim, and a negative number if it hits below or to the left.
- Similarly, you can also set the click corrections for your 3rd cartridge etc.
EXAMPLE: Sighting in a FMJ cartridge
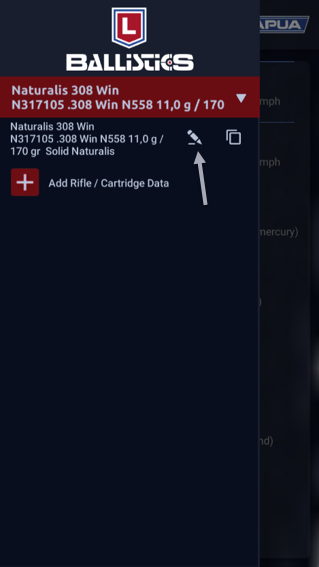
You want to use the Lapua Naturalis cartridge with the N558 bullet as the primary profile and create a parallel profile in the same rifle using the 8g FMJ (S374) bullet. àCopy the Naturalis profile and start updating the copied profile with the FMJ cartridge data. When sighting-in, the FMJ cartridge shot group hits the target 4cm above the point of aim.
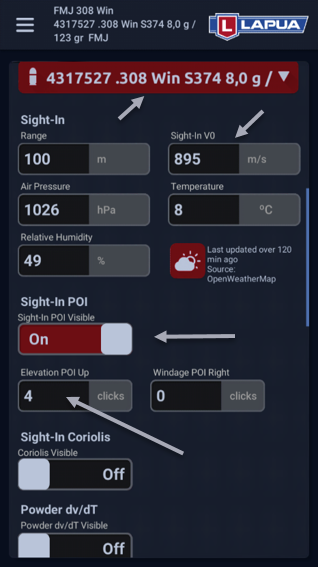
- Select Manage Rifle / Cartridge Data from the menu, activate the Sight-In POI feature, enter the value 4 in the Elevation POI Up column (in the example case, the sight-in distance is 100m and the scope click setting 1cm / 100m). Save the profile after changing the settings.
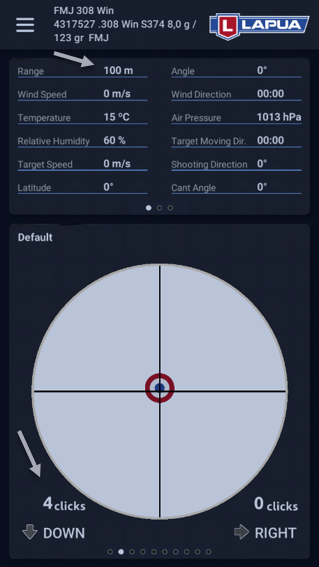
- In the Calculator view for a shooting distance of 100m, the needed correction indicated by the calculator should now be ↓ 4 clicks, and in the crosshair view, the point of impact for the shot group should be slightly above the center grid.
Good to know about the Sight–in poi feature
- When using the Sight-In POI feature, the sight-in distances don’t have to be the same for all cartridges (for the sake of clarity, the same distance was used in the previous example).
- The PBR sight-in presented in the previous Lapua Ballistics Tip can also be entered into the rifle profile with the Sight-In POI feature, example: The optimal sight-in distance for a cartridge is 170m but you only have a 100m shooting range. Sight-in the rifle at 100m so that the hits are approx. 5 cm above the point of aim. Enter a sight-in distance of 100m in the rifle profile and 5 clicks in the Sight-In POI Elevation window.
- If the scope doesn’t have resettable turrets, mark the zero points of the primary cartridge with something, eg. a sticker.
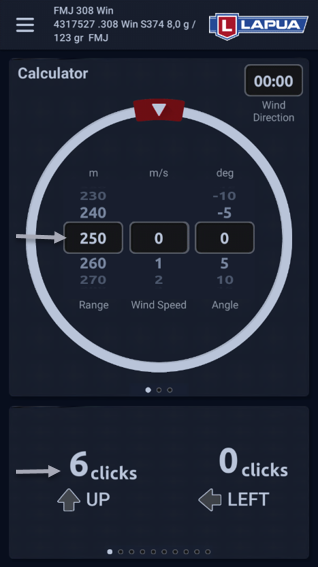
- When the Sight-In POI feature is activated in the profile, it is easiest to make sight corrections using the clicks no matter what the shooting distance. Example using the previously created 8g FMJ bullet profile: When shooting at 250m, an increase of 6 clicks is required.
- The Sight-In POI feature is available for Lapua products and Custom profiles.
|
|