« Back Lapua Ballistics Tips: Point blank range and V0 calculation
We are kicking off a brand new series on our website:
Lapua Ballistics app tips! Get the most out of our free of charge ballistics calculator by following our tips which we will be sharing all through year 2020. The first tips are:
Utilizing Point Blank Range and
V0 or Muzzle velocity calculation. The next tip will be the Sight-In POI feature, followed by benefits of 6 DOF calculation.
TIP: Utilizing Point Blank Range
The Point Blank Range (PBR) feature shows the min to max distance within which the bullet will hit the predefined target area without adjusting the point of aim or scope. Knowing the PBR is useful in situations where you don’t have time to make adjustments to your scope or you don’t know the exact shooting distance – a typical situation when hunting. By calculating the PBR you can optimize your sight-in distance so that the PBR is as long as possible. We will also explain how you can “set” your scope for a distance of e.g. 170 m , even if you only have a 100 m shooting range.
How to use the Point Blank Range feature in Lapua Ballistics:
- Choose your cartridge and set correct muzzle velocity and barrel twist.
- Important - make sure you have entered the correct “Line of Sight to Bore”. Line of Sight to Bore refers to the distance between center of the bore to the optical axis of the scope.
- Weather conditions don’t have significant impact on this feature. Insert the typical temperature, air pressure and humidity for your hunting area.
- Define the target hit area size in relation to the point of aim (the perfect hit), i.e. enter the height of the pipe within which the trajectory should be.
- By comparing (i.e. bracketing) values, you can optimize sight-in distance by changing it to the distance within which the bullet stays within the pipe you have entered.
- In practice, you want a sight-in distance where the highest point of the flight path touches on the top of the pipe you entered.
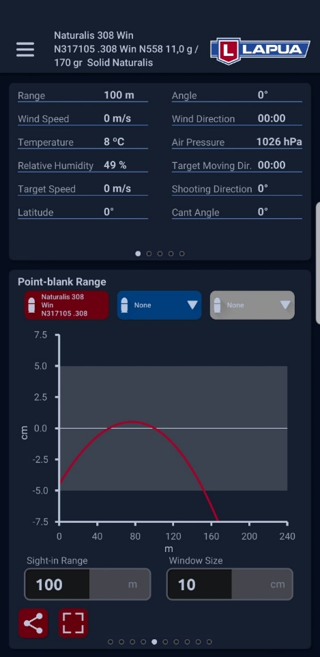
EXAMPLE: PBR for big game hunting cartridge
In this example, the shooter wants the bullet to hit the target (+/- 5 cm) within a 10 cm window size. If the rifle is sighted in at a distance of 100 m, the shooting distance range is 0 to 160 m without adjusting the scope or changing the point of aim.
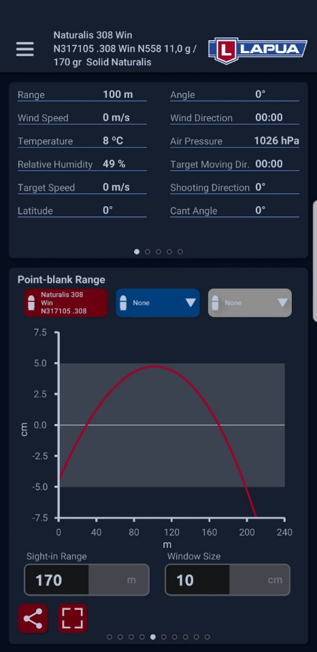
By bracketing, the optimum sight-in distance is found to be 170 m, with the shooting distance range of 0 - 200 m without adjusting the scope of changing the point of aim. The Elevation LOS column in the flight path table (below) indicates the elevation height of the bullet in relation to the line of sight.
 |
 |
Utilizing the flight path table
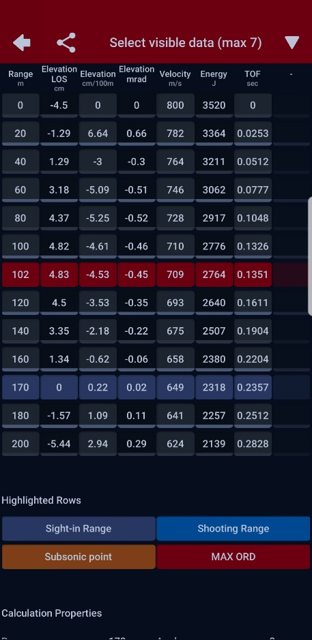
- The trajectory table shows that when sighted in at 170 m, the bullet hits 4.82 cm above the point of aim at 100 m. The Elevation LOS column indicates the position of the bullet in relation to the line of sight.
- At the barrel muzzle (0 m), the bullet is 4.5 cm below the line of sight (LOS), which is naturally the same value as the distance for line of sight to bore.
- The bullet is at its highest point of 4.83 cm at 102 m.
- At 200 m, the bullet hits 5.44 cm below the point of aim.
- LOS = Line Of Sight
- The PBR curve can also be viewed with Custom bullets, but the trajectory table can only be calculated for Lapua bullets and cartridges.
|
|
Error calculation / unstable bullet

- If there is clear ripple pattern on the trajectory curve, the bullet trajectory and calculation are not reliable. The most likely reason is that the barrel twist rate is too low, so that the bullet does not stabilize but oscillates as it flies from side to side and can even turn completely sideways.
- In such a situation, make sure by test shooting that the bullet holes in the target are round and that the group size is small enough for its purpose.
- If the bullet is not stable, it will not work as intended. The hit rate is usually bad and the hunting bullet will not expand as designed if it hits the target in a tilted position.
- The only effective way to improve stability is to replace the barrel with one with a faster twist rate or opt for a shorter bullet.
- You can attempt to increase stability a little by increasing muzzle velocity if the pressure limits allow this.
|
|
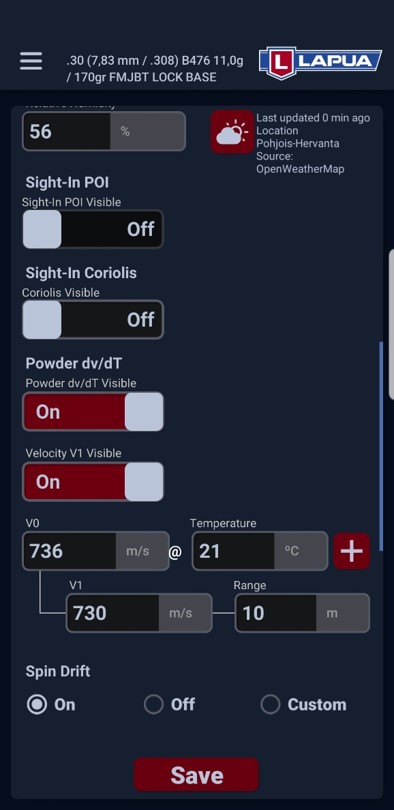
TIP: Muzzle velocity calculation
Most ballistics programs require the muzzle velocity V (at 0 m/yds) of the bullet as the starting value for ballistic calculation. However, most chronographs have to be installed several meters/yards in front of the barrel muzzle so that the muzzle pressure and muzzle flame do not interfere with the result or damage the chronograph. With the muzzle velocity calculation function, the bullet velocity V measured at a distance of x meters/yards can be converted to the bullet velocity V at the muzzle of the barrel (at 0 m/yds). The function is only intended for short distances, less than (or maximum) 25 m/yds.
Using the function:
- Enter the editing mode of the cartridge you are using (pen image).
- Activate the Powder dv/dT Visible button
- Activate the Velocity V1 Visible button
- Enter the distance from the barrel muzzle to the chronograph in the Range window (unit m or yd; here 10 m) and the velocity reading by the chronograph in the V1 window (unit m/s or fps; here 730 m/s).
- The muzzle velocity of the bullet is shown in the V0 window (unit m/s or fps; here 736 m/s).